Setting up a Router Phone on 3CX

Using a software-based PBX like 3CX, you can leverage your network infrastructure and reduce the need for dedicated hardware.
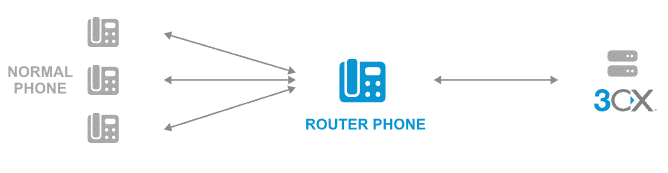
With Fanvils latest products, 3CX software allows users to transform their Fanvil device into an SBC (session boarder controller) router phone. This provided flexibility and scalability, removing the need of a Raspberry Pi – saving you money and deployment time!
Wondering which Fanvil phones support Router Phone on SBC?
Fanvil V Series
Fanvil V62, V64 & V65. Checkout our other blog for more information on V Series devices.
Fanvil XU Series
Fanvil X4U-V2, X5U-V2, X6U-V2, X7-V2, X7C-V2, X210-V2 and X210i-V2
What you need to know before configuring your SBC
3CX offers easy management, providing a friendly web interface making it accessible to everyone, no matter of your technical expertise. To make SBC setup even easier for you, we have crafted together a simple step by step guide for you to follow. As the leading 3CX Solutions Provider, it is our duty to make processes as simple and straight forward as possible.
This demonstration uses the Fanvil X4U V2 as the chosen VoIP phone that supports SBC configuration.
With the 3CX Update V20, all of the configuration can be done using the 3CX Web Client. It is important to consider that you will need to check and adjust user rights for the person setting up the router phone.
Top tip – if you don’t see the admin toggle in your 3CX Web Client then you don’t have the relevant user rights
Step 1 – User rights on the 3CX Web Client
- In the 3CX Web Client select Admin
- Select Users
- Under Role, the user setting up the SBC must be set as System Admin, System Owner, or if the user is based within the same department they can also be set as Department Admin, Manager or Owner.
Step 2 – Setting the SBC in the 3CX Web Client
- In the 3CX Web Client, select Admin
- Select users
- Select IP Phone
- Select Configure a Phone
- When promoted choose the phone model from the list
- Enter MAC addresses and select Next
- Choose Connect directly
- Once your happy all the details are correct, Select Add phone
Step 3 – Rebooting your phone
- Log in to the phones web interface
- See the configuration guide for this phone
- Enter the provisioning link
- Save and reboot phone – In this case, we must restart the Fanvil X4U V2 by unplugging and plugging in the phone. Once your device has restarted, your IP Phone will be automatically provisioned.
Still looking for more information?
If you would like more information or have a question about compatible products, we have a friendly helpful sales team here to help. Please contact us on sales@yellowgrid.co.uk or call 03330144340.